Watering
Cost to Install Lawn Sprinkler System: Expert Tips & Guide
Get a realistic look at the cost to install a lawn sprinkler system: expert tips & guide for pricing, design, DIY vs pro, and long term water savings.
james-thornton
10 min read
Sprinkler installation costs confuse many homeowners because the price can swing from “affordable project” to “small renovation” depending on details that are not obvious at first glance. The issue is that most people focus only on the quoted system price, while the real cost to install a lawn sprinkler system also includes design decisions, site conditions, and long term operating costs that start the day it is turned on.
When someone searches for “cost to install lawn sprinkler system: expert tips & guide,” they usually want three things: a realistic price range for their yard size, an understanding of what drives those costs up or down, and practical guidance on whether to DIY or hire a professional. This guide addresses each of those points, then adds field-tested tips so you can avoid paying for features you will not use or repairs that could have been prevented.
The main cost drivers are yard size, system type (basic vs smart, spray vs rotors vs drip), water source and pressure, and how complicated your layout is to trench and pipe. Labor can equal or exceed material costs in many markets, especially where there is lots of hardscape to work around. On top of that, hidden items like permits, backflow testing, and repairing lawn damage after trenching can add a few hundred dollars if you do not plan ahead.
There are several misconceptions worth clearing up. Properly designed irrigation does not automatically waste water; in fact, a correctly zoned and scheduled system is often more efficient than manual hose watering. DIY is not always cheaper once you factor in tool rental, time, and the risk of design errors that create dry spots or overwatering. And there is no single “standard cost” because a small, simple front yard might run under $3,000, while a large, complex landscape with smart controls and multiple water sources can exceed $10,000.
This guide is most helpful if you are planning a new build, replacing a failing or obsolete sprinkler system, or budgeting as part of a larger landscape renovation. If you are also reshaping your yard, resources like How to Level a Bumpy Lawn, How to Aerate a Lawn for Deeper Root Growth, and Lawn Watering Schedule by Season are useful to combine with your irrigation planning.
For most homes, the cost to install a lawn sprinkler system typically ranges from about $3,000 to $7,000, with small, simple yards starting closer to $2,000 and large, complex lots often running $8,000 or more. The fastest way to narrow your own range is to estimate your irrigated square footage and count how many separate “areas” you really have, such as front lawn, back lawn, side yard, and planting beds. Multiply your total irrigated area (in thousands of square feet) by roughly $1.50 to $2.50 for basic systems, or $2.50 to $3.50 for mid range systems, to get a quick ballpark.
To verify whether you are likely to be on the low or high side of that estimate, walk your property and look for hardscapes, slopes, and tight spaces that will force extra zones or careful head layout. Straightforward rectangles with good existing water pressure tend to sit on the low end, while yards with lots of curves, mature trees, and long narrow side strips push costs up. If your water pressure is under about 40 psi at an exterior spigot, factor in the possibility of more, smaller zones or even a booster pump, which will increase total project cost.
Once installed, expect a properly tuned system to reduce hand watering almost immediately, and you should see more uniform color and fewer dry spots within 2 to 4 weeks, assuming you follow a correct watering depth of about 1 to 1.5 inches per week during growing season. Plan on a yearly backflow test and occasional nozzle cleanouts as minor ongoing costs. If you choose a smart controller and adjust schedules based on weather, you can usually trim water use within the first season while keeping turf density stable.
When you evaluate the cost to install a lawn sprinkler system, it is useful to break the project into materials, labor, and often overlooked extras. This is how contractors build their bids, and it is also how you can compare quotes accurately.
Material costs usually include:
Labor costs reflect the complexity of design and installation. A typical professional install covers site evaluation, layout design, and zoning; trenching or pulling pipe; setting heads at the correct height and spacing; wiring valves and the controller; and final adjustments and cleanup. In some yards, landscape restoration after trenching is straightforward, but if you have established sod or delicate beds, labor for careful restoration can be significant.
There are also hidden or often forgotten costs:
Actual prices vary by region, but national averages provide a reference window before you start collecting local bids.
Small yards (under 1/4 acre of irrigated area) often range from about $2,000 to $4,000 for a professionally installed in ground system. These lots usually require fewer zones and shorter pipe runs, which reduces both materials and labor. Costs trend toward the high side if the yard is highly landscaped or broken into many small segments.
Medium yards (1/4 to 1/2 acre) frequently fall between $3,500 and $6,500. The number of zones typically increases enough that valve manifolds, wiring, and trenching time start to add up. At this size, many homeowners opt for mid range features such as a smart controller and a mix of rotor heads for open lawns and drip for beds.
Large yards (1/2 to 1 acre and up) can range from $6,000 to $12,000 or more, especially when there are multiple lawns, long narrow sides, and extensive planting beds. Larger properties usually need more valves, more wire, and more trenching, and they are more likely to press the limits of existing water pressure, sometimes requiring pumps or zone splitting.
A simple tiered view is helpful when comparing system types:
Square footage is the most obvious cost driver. More irrigated area means more heads, pipe, wire, and trenching. A straightforward way to estimate impact is that each additional 1,000 square feet of lawn typically adds at least one zone or several additional heads to an existing zone, along with the materials and time that go with them.
However, layout often has more influence on the final price than total area. A simple, rectangular front and back lawn is relatively easy to design and install. Curved beds, tight side yards, and irregular shapes require more customized head placement to avoid dry spots and overspray. Long narrow side yards often need strip pattern nozzles or closely spaced heads, which can increase material counts and labor.
Hardscaping also plays a role. Driveways, patios, sidewalks, pools, and retaining walls break a lawn into smaller waterable areas. Each separate section may need its own zone or changed head pattern, especially if turf on one side of a hardscape needs different run times than beds or shaded areas. Crossing under driveways or walkways often requires boring or specialized tools, which add time and sometimes subcontractor fees.
Underground obstructions complicate installation further. Mature trees, extensive root systems, existing landscape lighting, gas lines, or other utilities limit where trenches can run. Navigating around roots or utilities often means more hand digging, shallow trench segments, or rerouting pipe, all of which add labor hours.
Before requesting quotes, measure your yard accurately. You can:
Providing a reasonably accurate irrigated square footage when you speak with contractors helps them give tighter preliminary ranges and makes their final bids easier to compare.
Soil type and drainage determine how fast water can soak in and how long zones can run before puddling or runoff starts. This in turn affects both design and cost. Clay soils absorb water slowly, so zones must run with shorter cycles and sometimes use lower precipitation rate heads. Sandy soils drain quickly, so you may need shorter intervals between waterings or slightly higher application rates to reach the 1 to 1.5 inches per week that most turf requires during peak season.

Loam soils sit between these extremes and are usually the easiest to manage. If you are not sure what you have, a simple test is to moisten a handful of soil and squeeze it. If it forms a tight, sticky ribbon, you likely have higher clay content. If it falls apart and feels gritty, sand content is higher. This is not laboratory precise but is good enough for irrigation planning.
Poor drainage and low spots create additional complexity. Areas that routinely puddle after rain or irrigation are prone to disease and root problems if they stay saturated. To manage this, designers sometimes add drainage solutions such as French drains, catch basins, or dry wells, which significantly add to cost. They may also specify heads with built in check valves to prevent low head drainage, where water in pipes drains out the lowest heads after each cycle, creating chronic wet spots.
If you see standing water lasting more than 24 hours after a 1 inch rainfall, consider addressing drainage as part of the project. The cost of adding a few drains and some gravel during sprinkler installation is usually lower than retrofitting later, when turf is re established and pipes are already in place. The related guide How to Improve Lawn Drainage for Healthier Grass provides additional strategies if drainage is a known problem on your property.
Where your water comes from and how much pressure and flow you have are central to both design and cost. Municipal water supplies usually offer the simplest connection, often from the main service line near where it enters the house. In many cities, homeowners can add a separate irrigation meter, which may reduce sewer charges since irrigation water does not return to the sewer system. However, installing a second meter has its own one time cost that should be included in your budget.
Private wells introduce other considerations. A typical residential well and pump system can only deliver a certain gallons per minute (GPM) without cycling excessively. If your well delivers, for example, 8 GPM at 40 psi, the system must be designed so each zone uses less than that flow, or the pump will short cycle. In some cases, an additional storage tank or upgraded pump is required, which can substantially increase project costs.
Ponds, lakes, or rivers are sometimes used as irrigation sources, but these require pumps, intake screens, and filters, along with permits in many jurisdictions. The cost of a durable surface or submersible pump sized to your system, plus electrical work and filtration, often equals or exceeds the basic cost of the sprinkler materials themselves.
Existing water pressure and flow rate at your property are critical. A contractor typically tests pressure with a gauge at an outdoor spigot and measures flow by timing how long it takes to fill a known size bucket. As a rough rule of thumb, if you have at least 40 to 60 psi static pressure and 10 to 15 GPM available, design is straightforward. Lower pressure or lower flow means more zones, smaller groupings of heads, or in some cases a booster pump. More zones equal more valves, wire, and trenching, which increases cost.
Backflow prevention requirements also affect price. Many municipalities require a specific type of backflow device for irrigation systems, such as a pressure vacuum breaker (PVB) or reduced pressure zone (RPZ) backflow preventer. The device itself can cost from a couple hundred dollars upward, and local regulations often require annual testing by a licensed tester, which becomes an ongoing cost. Ask each contractor which device type their bid includes and whether testing is part of their service or your responsibility.
System type is another major cost lever, and choosing correctly can reduce both upfront and long term expenses. There are three broad categories: in ground automatic, above ground or hose end, and drip irrigation.
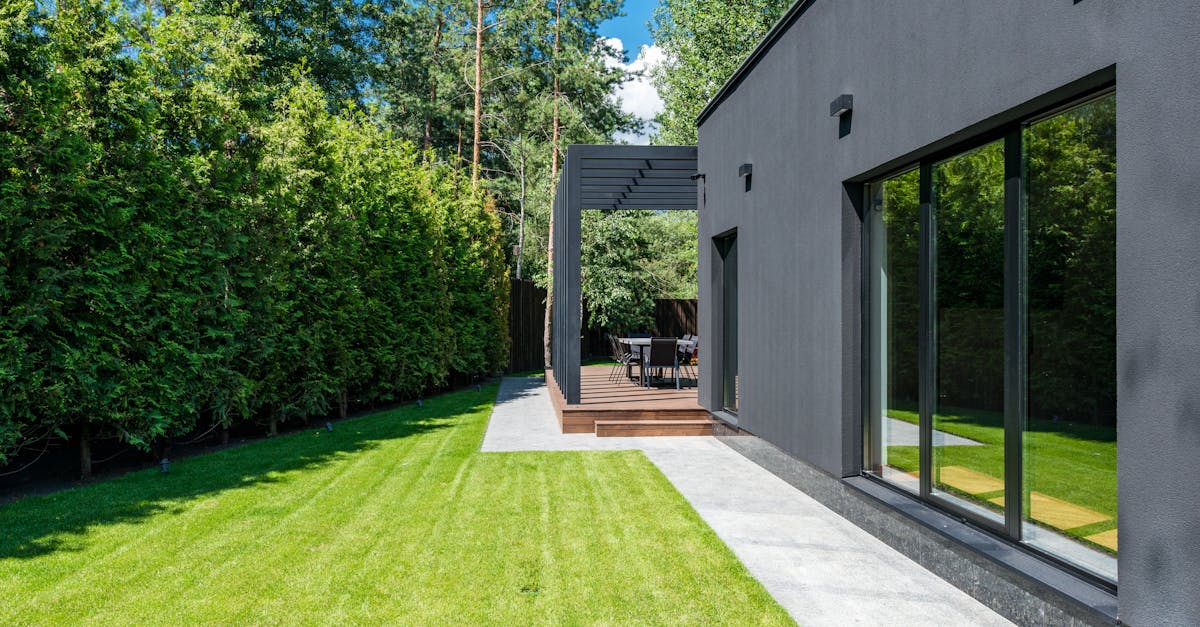
In ground automatic systems are what most homeowners picture when they think of sprinklers. Heads pop up from the lawn, zones run on a set schedule from a controller, and everything is buried. These systems cost more to install but are the most convenient, uniform, and compatible with long term turf health. They are also the focus of the cost ranges in this guide.
Above ground or hose end setups use portable sprinklers attached to garden hoses. While inexpensive, they require manual moving and timing. For very small yards or temporary solutions, they are economical, but for most medium and large lawns, the labor and uneven coverage eventually push people toward in ground systems.
Drip irrigation uses tubing and emitters to deliver water directly to soil near plant roots, primarily in beds and around shrubs or trees. Drip is very efficient and often required or strongly recommended in drought sensitive areas, but it is usually combined with standard spray or rotors for open lawn areas. Adding drip zones modestly raises upfront cost but can significantly reduce water waste in beds.
The type of sprinkler heads themselves matters for cost and performance:
Controllers can be basic or smart. A simple, non connected timer costs less initially, but requires manual scheduling and seasonal adjustments. Smart controllers, which adjust watering based on weather data, soil type, and sometimes plant type, cost more upfront but often reduce water use enough to pay back the difference within a few seasons, especially in areas with high water rates. If you are interested in the technology side, the guide Smart Irrigation Systems: Are They Worth It? is a useful deeper dive.
Labor rates and access conditions are often the difference between a modest and a high quote for the same square footage. In regions with high general construction wages, labor may equal or exceed the total material cost. In lower cost areas, materials are often the larger share.
Access affects how easily installers can get machinery into the yard. Narrow gates, steep slopes, or obstacles that limit equipment travel may force a crew to rely more on hand trenching, which increases time. If the only way to reach the backyard is through a finished garage or narrow side path, contractors may allow extra hours for careful material handling and cleanup.
Climate also influences regional design norms. In cold climates where winterization is required, systems are usually designed with blowout access so compressed air can be used to clear lines before freeze. That adds small material and labor items, but it significantly extends system life. In warm climates with year round irrigation, UV exposure and water quality may drive choices such as using more durable pipe or filters, which adds to material cost but reduces maintenance.
DIY installation is often seen as a way to cut the cost to install a lawn sprinkler system, but the savings and risks vary by project. For straightforward, small yards with basic needs, a careful DIYer with time and willingness to learn can save on labor. However, for complex sites or where local codes and backflow requirements are strict, hiring a professional is usually more cost effective in the long run.
DIY costs include materials, tool rental, and your time. You might pay roughly the contractor material cost, then add rental for a trencher or pipe puller, plus smaller tools and measuring equipment. If your design is efficient and correct, you can avoid paying markups on materials and labor overhead. If not, you can end up with dry spots, overspray on hardscapes, or insufficient pressure at distant heads, all of which can cost more to correct than hiring a pro from the start.
In general, DIY is most suitable when:
Professional installation is usually better when:
One practical hybrid approach is to pay for a professional design and material list, then complete some or all of the trenching and restoration yourself. This can reduce total cost while keeping layout and hydraulics professionally engineered.
Planning ahead reduces change orders and surprise costs. A structured process also makes it easier to compare contractor proposals on equal terms.
Step 1 (Week 1): Document your site
Measure irrigated areas, note slopes and obvious drainage issues, and sketch where turf, planting beds, and hardscapes are located. Take photos from different angles. Mark visible utilities and note where you suspect buried lines might be, based on meters and service entrances.
Step 2 (Week 1 to 2): Check water conditions
Test your water pressure at an outdoor faucet with an inexpensive gauge. If it is under about 40 psi, mention that to contractors so they can design appropriately. Conduct a simple flow test by timing how long it takes to fill a 5 gallon bucket. This gives a basic GPM figure for preliminary design discussions.
Step 3 (Week 2): Define your priorities
Decide which areas must be irrigated (main lawn, key beds) and which can remain manual or unirrigated (back corners, naturalized areas). Clarify whether you value lower upfront cost over long term water savings or vice versa. This will drive choices like standard vs smart controllers and spray vs drip in beds.
Step 4 (Week 2 to 3): Collect at least 2 to 3 bids
Provide each contractor with the same information and ask them to include a drawing or description of zones, head types, controller type, backflow model, and any optional upgrades. Make sure bids specify whether permits, backflow testing, and restoration are included.
Step 5 (Week 3 to 4): Compare proposals on more than price
Look at design details, proposed materials, warranty terms, and timelines. Ask how they handle low pressure areas and how they plan to avoid overspray onto sidewalks and driveways. Confirm whether they will walk through the controller programming with you and provide recommended schedules for your grass type. Guides like Best Time of Day to Water Your Lawn and How Often to Water Based on Grass Type are helpful references when you review their suggested schedules.
Step 6 (Installation week): Monitor progress and ask questions
During installation, verify that main features align with the plan, such as drip zones in beds if you requested them. Ask the crew leader to show you valve locations and how to shut the system off manually in case of a break. Once complete, walk each zone with them and note coverage as they fine tune head angles and arcs.
Beyond the initial cost to install a lawn sprinkler system, operating and maintenance expenses continue for the life of the system. Understanding them in advance prevents surprises and helps you choose features that may reduce long term spending.
Water usage is the largest ongoing cost. A typical cool season lawn might need 1 to 1.5 inches of water per week during peak summer if rainfall is insufficient. For a 5,000 square foot lawn, 1 inch of water equals roughly 3,100 gallons. At that rate, consistent irrigation over a summer can add tens of thousands of gallons to your water bill. Smart controllers, proper scheduling, and attention to guides like Avoiding Overwatering Mistakes and Signs of Underwatering in Grass can help keep use efficient.
Seasonal adjustments take time but not much money. If you live in freezing climates, you or a contractor will need to winterize the system each fall, typically between the first hard freeze warning and soil temperatures dropping consistently below freezing. Winterization services often run a modest per visit fee, while compressed air rental can be an option for those experienced enough to perform it safely themselves.
Repairs and replacements over time are normal. Heads can be broken by mowers, valves can fail, and controllers can age. Budgeting a small annual amount for maintenance, perhaps a few hundred dollars depending on system size, is reasonable. Systems that were designed with proper pressure regulation, filtration where needed, and appropriate head selection usually experience fewer breakdowns.
Many online cost summaries for sprinkler systems oversimplify or skip practical diagnostics that can change your budget significantly. Three areas in particular deserve more attention.
1. Confirming soil and drainage before design
Guides often mention soil type but rarely provide a threshold for action. If you notice that your yard currently shows runoff after less than 10 to 15 minutes of hose watering, this usually points to compaction or tight soils. Confirm by pushing a screwdriver into moist soil; if you cannot get it at least 6 inches deep with firm hand pressure, aeration and possibly drainage improvements should be considered before or during installation. Skipping this step can lead to paying for a larger system that then cannot run long enough to apply water evenly without ponding.
2. Testing water pressure and flow instead of guessing
Some estimates assume “normal” pressure, but pressure varies widely even within neighborhoods. If your exterior faucet shows under about 40 psi static and your bucket test yields less than around 8 GPM, you are likely to need more but smaller zones or sometimes a booster pump. Confirm these numbers before bids so contractors can design to your reality rather than to assumptions. Designing for 12 GPM when you only have 7 GPM will guarantee underperforming zones and potential redesign costs.
3. Accounting for restoration and hardscape crossings
Many cost summaries understate what it takes to restore a well maintained lawn after trenching. If your turf is dense and you want it to look nearly identical within one growing season, budget for quality seed or sod and a follow up schedule that includes topdressing, watering, and possibly a light fertilizer at the right timing window, typically 4 to 6 weeks after installation for cool season lawns. Also clarify how contractors will cross driveways and walks and whether any concrete or paver work is included, so you are not surprised by separate charges after the fact.
The real cost to install a lawn sprinkler system is a combination of materials, labor, site conditions, and long term operating choices. Yard size, layout complexity, soil and drainage, water source, and system type all interact to set your final price. By measuring your irrigated area, checking water pressure and flow, identifying drainage issues, and defining which areas truly need irrigation, you turn a vague “what will it cost?” question into a focused conversation with clear numbers and trade offs.
With a well planned design and correct scheduling, an in ground sprinkler system becomes a tool for consistent turf health rather than a source of wasted water. You gain more uniform color, fewer dry spots, and less manual hose work, while keeping irrigation within the 1 to 1.5 inches per week target for most lawns during peak growth. Ready to take the next step in protecting that investment? Check out Best Time of Day to Water Your Lawn to dial in your daily schedule once your new system is up and running.
Sprinkler installation costs confuse many homeowners because the price can swing from “affordable project” to “small renovation” depending on details that are not obvious at first glance. The issue is that most people focus only on the quoted system price, while the real cost to install a lawn sprinkler system also includes design decisions, site conditions, and long term operating costs that start the day it is turned on.
When someone searches for “cost to install lawn sprinkler system: expert tips & guide,” they usually want three things: a realistic price range for their yard size, an understanding of what drives those costs up or down, and practical guidance on whether to DIY or hire a professional. This guide addresses each of those points, then adds field-tested tips so you can avoid paying for features you will not use or repairs that could have been prevented.
The main cost drivers are yard size, system type (basic vs smart, spray vs rotors vs drip), water source and pressure, and how complicated your layout is to trench and pipe. Labor can equal or exceed material costs in many markets, especially where there is lots of hardscape to work around. On top of that, hidden items like permits, backflow testing, and repairing lawn damage after trenching can add a few hundred dollars if you do not plan ahead.
There are several misconceptions worth clearing up. Properly designed irrigation does not automatically waste water; in fact, a correctly zoned and scheduled system is often more efficient than manual hose watering. DIY is not always cheaper once you factor in tool rental, time, and the risk of design errors that create dry spots or overwatering. And there is no single “standard cost” because a small, simple front yard might run under $3,000, while a large, complex landscape with smart controls and multiple water sources can exceed $10,000.
This guide is most helpful if you are planning a new build, replacing a failing or obsolete sprinkler system, or budgeting as part of a larger landscape renovation. If you are also reshaping your yard, resources like How to Level a Bumpy Lawn, How to Aerate a Lawn for Deeper Root Growth, and Lawn Watering Schedule by Season are useful to combine with your irrigation planning.
For most homes, the cost to install a lawn sprinkler system typically ranges from about $3,000 to $7,000, with small, simple yards starting closer to $2,000 and large, complex lots often running $8,000 or more. The fastest way to narrow your own range is to estimate your irrigated square footage and count how many separate “areas” you really have, such as front lawn, back lawn, side yard, and planting beds. Multiply your total irrigated area (in thousands of square feet) by roughly $1.50 to $2.50 for basic systems, or $2.50 to $3.50 for mid range systems, to get a quick ballpark.
To verify whether you are likely to be on the low or high side of that estimate, walk your property and look for hardscapes, slopes, and tight spaces that will force extra zones or careful head layout. Straightforward rectangles with good existing water pressure tend to sit on the low end, while yards with lots of curves, mature trees, and long narrow side strips push costs up. If your water pressure is under about 40 psi at an exterior spigot, factor in the possibility of more, smaller zones or even a booster pump, which will increase total project cost.
Once installed, expect a properly tuned system to reduce hand watering almost immediately, and you should see more uniform color and fewer dry spots within 2 to 4 weeks, assuming you follow a correct watering depth of about 1 to 1.5 inches per week during growing season. Plan on a yearly backflow test and occasional nozzle cleanouts as minor ongoing costs. If you choose a smart controller and adjust schedules based on weather, you can usually trim water use within the first season while keeping turf density stable.
When you evaluate the cost to install a lawn sprinkler system, it is useful to break the project into materials, labor, and often overlooked extras. This is how contractors build their bids, and it is also how you can compare quotes accurately.
Material costs usually include:
Labor costs reflect the complexity of design and installation. A typical professional install covers site evaluation, layout design, and zoning; trenching or pulling pipe; setting heads at the correct height and spacing; wiring valves and the controller; and final adjustments and cleanup. In some yards, landscape restoration after trenching is straightforward, but if you have established sod or delicate beds, labor for careful restoration can be significant.
There are also hidden or often forgotten costs:
Actual prices vary by region, but national averages provide a reference window before you start collecting local bids.
Small yards (under 1/4 acre of irrigated area) often range from about $2,000 to $4,000 for a professionally installed in ground system. These lots usually require fewer zones and shorter pipe runs, which reduces both materials and labor. Costs trend toward the high side if the yard is highly landscaped or broken into many small segments.
Medium yards (1/4 to 1/2 acre) frequently fall between $3,500 and $6,500. The number of zones typically increases enough that valve manifolds, wiring, and trenching time start to add up. At this size, many homeowners opt for mid range features such as a smart controller and a mix of rotor heads for open lawns and drip for beds.
Large yards (1/2 to 1 acre and up) can range from $6,000 to $12,000 or more, especially when there are multiple lawns, long narrow sides, and extensive planting beds. Larger properties usually need more valves, more wire, and more trenching, and they are more likely to press the limits of existing water pressure, sometimes requiring pumps or zone splitting.
A simple tiered view is helpful when comparing system types:
Square footage is the most obvious cost driver. More irrigated area means more heads, pipe, wire, and trenching. A straightforward way to estimate impact is that each additional 1,000 square feet of lawn typically adds at least one zone or several additional heads to an existing zone, along with the materials and time that go with them.
However, layout often has more influence on the final price than total area. A simple, rectangular front and back lawn is relatively easy to design and install. Curved beds, tight side yards, and irregular shapes require more customized head placement to avoid dry spots and overspray. Long narrow side yards often need strip pattern nozzles or closely spaced heads, which can increase material counts and labor.
Hardscaping also plays a role. Driveways, patios, sidewalks, pools, and retaining walls break a lawn into smaller waterable areas. Each separate section may need its own zone or changed head pattern, especially if turf on one side of a hardscape needs different run times than beds or shaded areas. Crossing under driveways or walkways often requires boring or specialized tools, which add time and sometimes subcontractor fees.
Underground obstructions complicate installation further. Mature trees, extensive root systems, existing landscape lighting, gas lines, or other utilities limit where trenches can run. Navigating around roots or utilities often means more hand digging, shallow trench segments, or rerouting pipe, all of which add labor hours.
Before requesting quotes, measure your yard accurately. You can:
Providing a reasonably accurate irrigated square footage when you speak with contractors helps them give tighter preliminary ranges and makes their final bids easier to compare.
Soil type and drainage determine how fast water can soak in and how long zones can run before puddling or runoff starts. This in turn affects both design and cost. Clay soils absorb water slowly, so zones must run with shorter cycles and sometimes use lower precipitation rate heads. Sandy soils drain quickly, so you may need shorter intervals between waterings or slightly higher application rates to reach the 1 to 1.5 inches per week that most turf requires during peak season.
Loam soils sit between these extremes and are usually the easiest to manage. If you are not sure what you have, a simple test is to moisten a handful of soil and squeeze it. If it forms a tight, sticky ribbon, you likely have higher clay content. If it falls apart and feels gritty, sand content is higher. This is not laboratory precise but is good enough for irrigation planning.
Poor drainage and low spots create additional complexity. Areas that routinely puddle after rain or irrigation are prone to disease and root problems if they stay saturated. To manage this, designers sometimes add drainage solutions such as French drains, catch basins, or dry wells, which significantly add to cost. They may also specify heads with built in check valves to prevent low head drainage, where water in pipes drains out the lowest heads after each cycle, creating chronic wet spots.
If you see standing water lasting more than 24 hours after a 1 inch rainfall, consider addressing drainage as part of the project. The cost of adding a few drains and some gravel during sprinkler installation is usually lower than retrofitting later, when turf is re established and pipes are already in place. The related guide How to Improve Lawn Drainage for Healthier Grass provides additional strategies if drainage is a known problem on your property.
Where your water comes from and how much pressure and flow you have are central to both design and cost. Municipal water supplies usually offer the simplest connection, often from the main service line near where it enters the house. In many cities, homeowners can add a separate irrigation meter, which may reduce sewer charges since irrigation water does not return to the sewer system. However, installing a second meter has its own one time cost that should be included in your budget.
Private wells introduce other considerations. A typical residential well and pump system can only deliver a certain gallons per minute (GPM) without cycling excessively. If your well delivers, for example, 8 GPM at 40 psi, the system must be designed so each zone uses less than that flow, or the pump will short cycle. In some cases, an additional storage tank or upgraded pump is required, which can substantially increase project costs.
Ponds, lakes, or rivers are sometimes used as irrigation sources, but these require pumps, intake screens, and filters, along with permits in many jurisdictions. The cost of a durable surface or submersible pump sized to your system, plus electrical work and filtration, often equals or exceeds the basic cost of the sprinkler materials themselves.
Existing water pressure and flow rate at your property are critical. A contractor typically tests pressure with a gauge at an outdoor spigot and measures flow by timing how long it takes to fill a known size bucket. As a rough rule of thumb, if you have at least 40 to 60 psi static pressure and 10 to 15 GPM available, design is straightforward. Lower pressure or lower flow means more zones, smaller groupings of heads, or in some cases a booster pump. More zones equal more valves, wire, and trenching, which increases cost.
Backflow prevention requirements also affect price. Many municipalities require a specific type of backflow device for irrigation systems, such as a pressure vacuum breaker (PVB) or reduced pressure zone (RPZ) backflow preventer. The device itself can cost from a couple hundred dollars upward, and local regulations often require annual testing by a licensed tester, which becomes an ongoing cost. Ask each contractor which device type their bid includes and whether testing is part of their service or your responsibility.
System type is another major cost lever, and choosing correctly can reduce both upfront and long term expenses. There are three broad categories: in ground automatic, above ground or hose end, and drip irrigation.
In ground automatic systems are what most homeowners picture when they think of sprinklers. Heads pop up from the lawn, zones run on a set schedule from a controller, and everything is buried. These systems cost more to install but are the most convenient, uniform, and compatible with long term turf health. They are also the focus of the cost ranges in this guide.
Above ground or hose end setups use portable sprinklers attached to garden hoses. While inexpensive, they require manual moving and timing. For very small yards or temporary solutions, they are economical, but for most medium and large lawns, the labor and uneven coverage eventually push people toward in ground systems.
Drip irrigation uses tubing and emitters to deliver water directly to soil near plant roots, primarily in beds and around shrubs or trees. Drip is very efficient and often required or strongly recommended in drought sensitive areas, but it is usually combined with standard spray or rotors for open lawn areas. Adding drip zones modestly raises upfront cost but can significantly reduce water waste in beds.
The type of sprinkler heads themselves matters for cost and performance:
Controllers can be basic or smart. A simple, non connected timer costs less initially, but requires manual scheduling and seasonal adjustments. Smart controllers, which adjust watering based on weather data, soil type, and sometimes plant type, cost more upfront but often reduce water use enough to pay back the difference within a few seasons, especially in areas with high water rates. If you are interested in the technology side, the guide Smart Irrigation Systems: Are They Worth It? is a useful deeper dive.
Labor rates and access conditions are often the difference between a modest and a high quote for the same square footage. In regions with high general construction wages, labor may equal or exceed the total material cost. In lower cost areas, materials are often the larger share.
Access affects how easily installers can get machinery into the yard. Narrow gates, steep slopes, or obstacles that limit equipment travel may force a crew to rely more on hand trenching, which increases time. If the only way to reach the backyard is through a finished garage or narrow side path, contractors may allow extra hours for careful material handling and cleanup.
Climate also influences regional design norms. In cold climates where winterization is required, systems are usually designed with blowout access so compressed air can be used to clear lines before freeze. That adds small material and labor items, but it significantly extends system life. In warm climates with year round irrigation, UV exposure and water quality may drive choices such as using more durable pipe or filters, which adds to material cost but reduces maintenance.
DIY installation is often seen as a way to cut the cost to install a lawn sprinkler system, but the savings and risks vary by project. For straightforward, small yards with basic needs, a careful DIYer with time and willingness to learn can save on labor. However, for complex sites or where local codes and backflow requirements are strict, hiring a professional is usually more cost effective in the long run.
DIY costs include materials, tool rental, and your time. You might pay roughly the contractor material cost, then add rental for a trencher or pipe puller, plus smaller tools and measuring equipment. If your design is efficient and correct, you can avoid paying markups on materials and labor overhead. If not, you can end up with dry spots, overspray on hardscapes, or insufficient pressure at distant heads, all of which can cost more to correct than hiring a pro from the start.
In general, DIY is most suitable when:
Professional installation is usually better when:
One practical hybrid approach is to pay for a professional design and material list, then complete some or all of the trenching and restoration yourself. This can reduce total cost while keeping layout and hydraulics professionally engineered.
Planning ahead reduces change orders and surprise costs. A structured process also makes it easier to compare contractor proposals on equal terms.
Step 1 (Week 1): Document your site
Measure irrigated areas, note slopes and obvious drainage issues, and sketch where turf, planting beds, and hardscapes are located. Take photos from different angles. Mark visible utilities and note where you suspect buried lines might be, based on meters and service entrances.
Step 2 (Week 1 to 2): Check water conditions
Test your water pressure at an outdoor faucet with an inexpensive gauge. If it is under about 40 psi, mention that to contractors so they can design appropriately. Conduct a simple flow test by timing how long it takes to fill a 5 gallon bucket. This gives a basic GPM figure for preliminary design discussions.
Step 3 (Week 2): Define your priorities
Decide which areas must be irrigated (main lawn, key beds) and which can remain manual or unirrigated (back corners, naturalized areas). Clarify whether you value lower upfront cost over long term water savings or vice versa. This will drive choices like standard vs smart controllers and spray vs drip in beds.
Step 4 (Week 2 to 3): Collect at least 2 to 3 bids
Provide each contractor with the same information and ask them to include a drawing or description of zones, head types, controller type, backflow model, and any optional upgrades. Make sure bids specify whether permits, backflow testing, and restoration are included.
Step 5 (Week 3 to 4): Compare proposals on more than price
Look at design details, proposed materials, warranty terms, and timelines. Ask how they handle low pressure areas and how they plan to avoid overspray onto sidewalks and driveways. Confirm whether they will walk through the controller programming with you and provide recommended schedules for your grass type. Guides like Best Time of Day to Water Your Lawn and How Often to Water Based on Grass Type are helpful references when you review their suggested schedules.
Step 6 (Installation week): Monitor progress and ask questions
During installation, verify that main features align with the plan, such as drip zones in beds if you requested them. Ask the crew leader to show you valve locations and how to shut the system off manually in case of a break. Once complete, walk each zone with them and note coverage as they fine tune head angles and arcs.
Beyond the initial cost to install a lawn sprinkler system, operating and maintenance expenses continue for the life of the system. Understanding them in advance prevents surprises and helps you choose features that may reduce long term spending.
Water usage is the largest ongoing cost. A typical cool season lawn might need 1 to 1.5 inches of water per week during peak summer if rainfall is insufficient. For a 5,000 square foot lawn, 1 inch of water equals roughly 3,100 gallons. At that rate, consistent irrigation over a summer can add tens of thousands of gallons to your water bill. Smart controllers, proper scheduling, and attention to guides like Avoiding Overwatering Mistakes and Signs of Underwatering in Grass can help keep use efficient.
Seasonal adjustments take time but not much money. If you live in freezing climates, you or a contractor will need to winterize the system each fall, typically between the first hard freeze warning and soil temperatures dropping consistently below freezing. Winterization services often run a modest per visit fee, while compressed air rental can be an option for those experienced enough to perform it safely themselves.
Repairs and replacements over time are normal. Heads can be broken by mowers, valves can fail, and controllers can age. Budgeting a small annual amount for maintenance, perhaps a few hundred dollars depending on system size, is reasonable. Systems that were designed with proper pressure regulation, filtration where needed, and appropriate head selection usually experience fewer breakdowns.
Many online cost summaries for sprinkler systems oversimplify or skip practical diagnostics that can change your budget significantly. Three areas in particular deserve more attention.
1. Confirming soil and drainage before design
Guides often mention soil type but rarely provide a threshold for action. If you notice that your yard currently shows runoff after less than 10 to 15 minutes of hose watering, this usually points to compaction or tight soils. Confirm by pushing a screwdriver into moist soil; if you cannot get it at least 6 inches deep with firm hand pressure, aeration and possibly drainage improvements should be considered before or during installation. Skipping this step can lead to paying for a larger system that then cannot run long enough to apply water evenly without ponding.
2. Testing water pressure and flow instead of guessing
Some estimates assume “normal” pressure, but pressure varies widely even within neighborhoods. If your exterior faucet shows under about 40 psi static and your bucket test yields less than around 8 GPM, you are likely to need more but smaller zones or sometimes a booster pump. Confirm these numbers before bids so contractors can design to your reality rather than to assumptions. Designing for 12 GPM when you only have 7 GPM will guarantee underperforming zones and potential redesign costs.
3. Accounting for restoration and hardscape crossings
Many cost summaries understate what it takes to restore a well maintained lawn after trenching. If your turf is dense and you want it to look nearly identical within one growing season, budget for quality seed or sod and a follow up schedule that includes topdressing, watering, and possibly a light fertilizer at the right timing window, typically 4 to 6 weeks after installation for cool season lawns. Also clarify how contractors will cross driveways and walks and whether any concrete or paver work is included, so you are not surprised by separate charges after the fact.
The real cost to install a lawn sprinkler system is a combination of materials, labor, site conditions, and long term operating choices. Yard size, layout complexity, soil and drainage, water source, and system type all interact to set your final price. By measuring your irrigated area, checking water pressure and flow, identifying drainage issues, and defining which areas truly need irrigation, you turn a vague “what will it cost?” question into a focused conversation with clear numbers and trade offs.
With a well planned design and correct scheduling, an in ground sprinkler system becomes a tool for consistent turf health rather than a source of wasted water. You gain more uniform color, fewer dry spots, and less manual hose work, while keeping irrigation within the 1 to 1.5 inches per week target for most lawns during peak growth. Ready to take the next step in protecting that investment? Check out Best Time of Day to Water Your Lawn to dial in your daily schedule once your new system is up and running.
Common questions about this topic
Most homes can expect to pay between about $3,000 and $7,000 for a professionally installed in-ground sprinkler system. Small, simple yards may come in closer to $2,000, while large or complex properties with advanced features can run $8,000 or more. Yard size, layout, and choice of system type all push the final number up or down.
Start by estimating your total irrigated square footage and then divide by 1,000. Multiply that number by roughly $1.50 to $2.50 per square foot for a basic system, or $2.50 to $3.50 per square foot for a mid-range system. This gives you a fast ballpark before you get detailed quotes.
Costs rise when the yard has lots of curves, slopes, narrow side strips, or hardscapes like patios and walkways that are tricky to trench around. Low water pressure, multiple water sources, smart controllers, and extra zones for complex planting beds also add to both material and labor costs. Even permits, backflow testing, and lawn repair after trenching can add a few hundred dollars.
DIY can seem cheaper upfront, but tool rentals, your time, and the risk of design mistakes can quickly erase those savings. Professional installers typically deliver better zoning, head layout, and water distribution, which helps avoid dry spots and overwatering. For many homeowners, the reduced risk and better long-term performance make professional installation more cost-effective.
Cool-season lawns generally do best with about 1 to 1.5 inches of water per week during the growing season. A properly designed system should be sized to deliver that amount without causing runoff or shallow rooting. Splitting run times into cycles is especially important on clay or compacted soils.
After installation, plan for a yearly backflow test, which many municipalities require, plus occasional nozzle cleanouts and minor adjustments. Water use becomes a regular operating cost, but a well-tuned system can actually reduce waste compared to hand watering. Smart controllers that adjust schedules based on weather can further trim water bills over the first season.
Subscribe for monthly lawn care tips and expert advice
Loading product recommendations...